Properly configuring networking is vital for any Ubuntu desktop or server. In this introduction, we’ll cover the key topics involved in managing network settings on Ubuntu 22.04 systems.
We’ll discuss core networking concepts like:
- Ethernet interfaces – Naming, logical mappings, and optimizing performance
- IP addressing – Dynamic DHCP, static IPs, and name resolution with DNS
- Bridging – Joining multiple interfaces together
- Static IP configuration on Ubuntu desktops
- ifconfig, nmcli: Command-line tools that can be used to configure Ubuntu network settings
Ubuntu 22.04 network configuration
Ubuntu 22.04 offers powerful tools for network configuration like Netplan, NetworkManager, systemd-networkd, and /etc/network/interfaces.
We’ll cover :
- How to Set static or dynamic IP addresses
- How to configure static IP address in Ubuntu 22.04 LTS
- How to set network configuration in Ubuntu
- How to Define DNS servers for name resolution
- How to Manage Ubuntu firewall settings policies with UFW
- How to Configure bridging and VLANs
- How to reset Ubuntu network settings
Whether you need to set up a simple DHCP client or optimize complex bonding with Netplan, this guide will help you master network settings in Ubuntu 22.04.
Read: What you need to do to secure Ubuntu
Ethernet Interface Management in Ubuntu 22.04
Ethernet is a wired networking technology that uses cables to connect devices to a network. In Ubuntu 22.04, Ethernet interfaces can be managed using a variety of tools and methods.
Checking Ethernet Interface Status
The first step in managing an Ethernet interface is to check its status. This can be done using the following commands:
ip link show
This command will list all of the network interfaces on the system, including the Ethernet interfaces. The output of this command will show the status of each interface, such as whether it is up or down, and its MAC address.
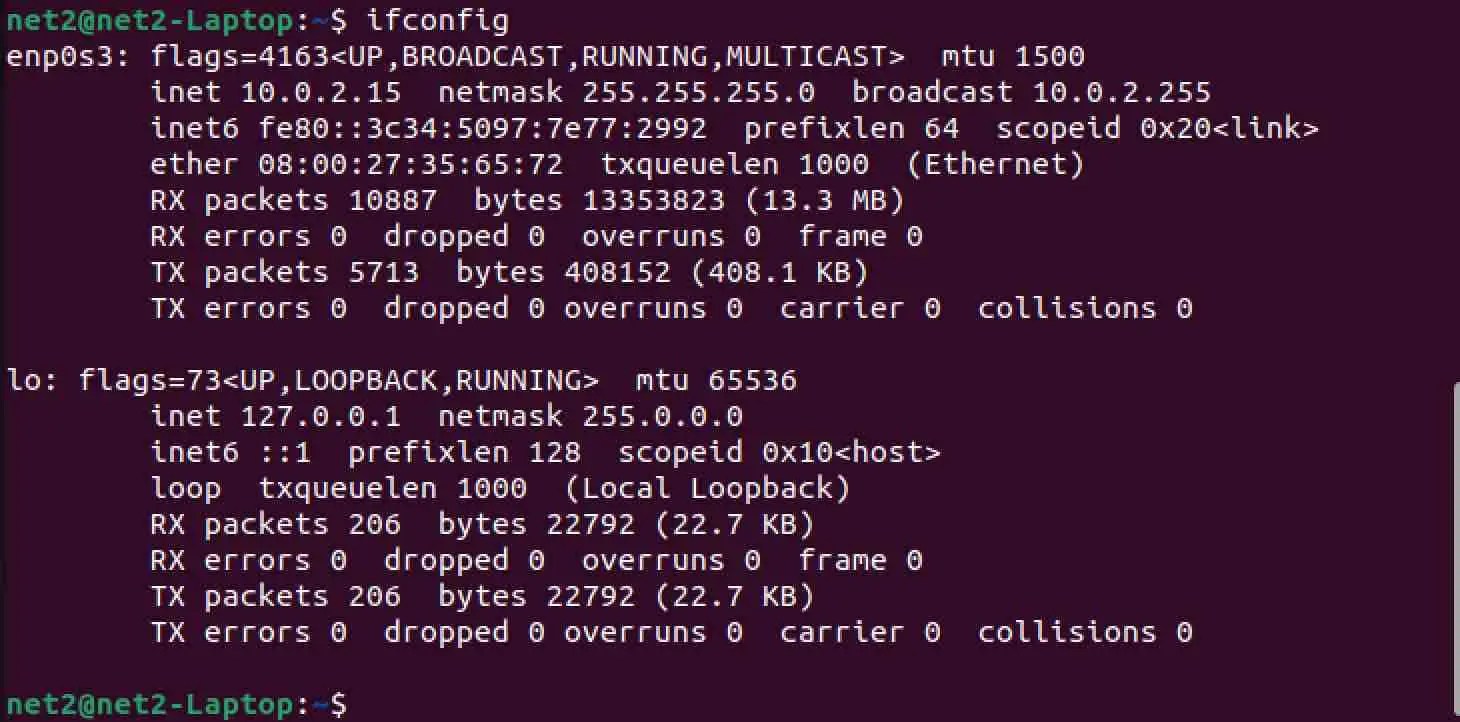
ifconfig
This command is a legacy command that can also be used to check the status of network interfaces. The output of this command is similar to the output of the ip link show command.
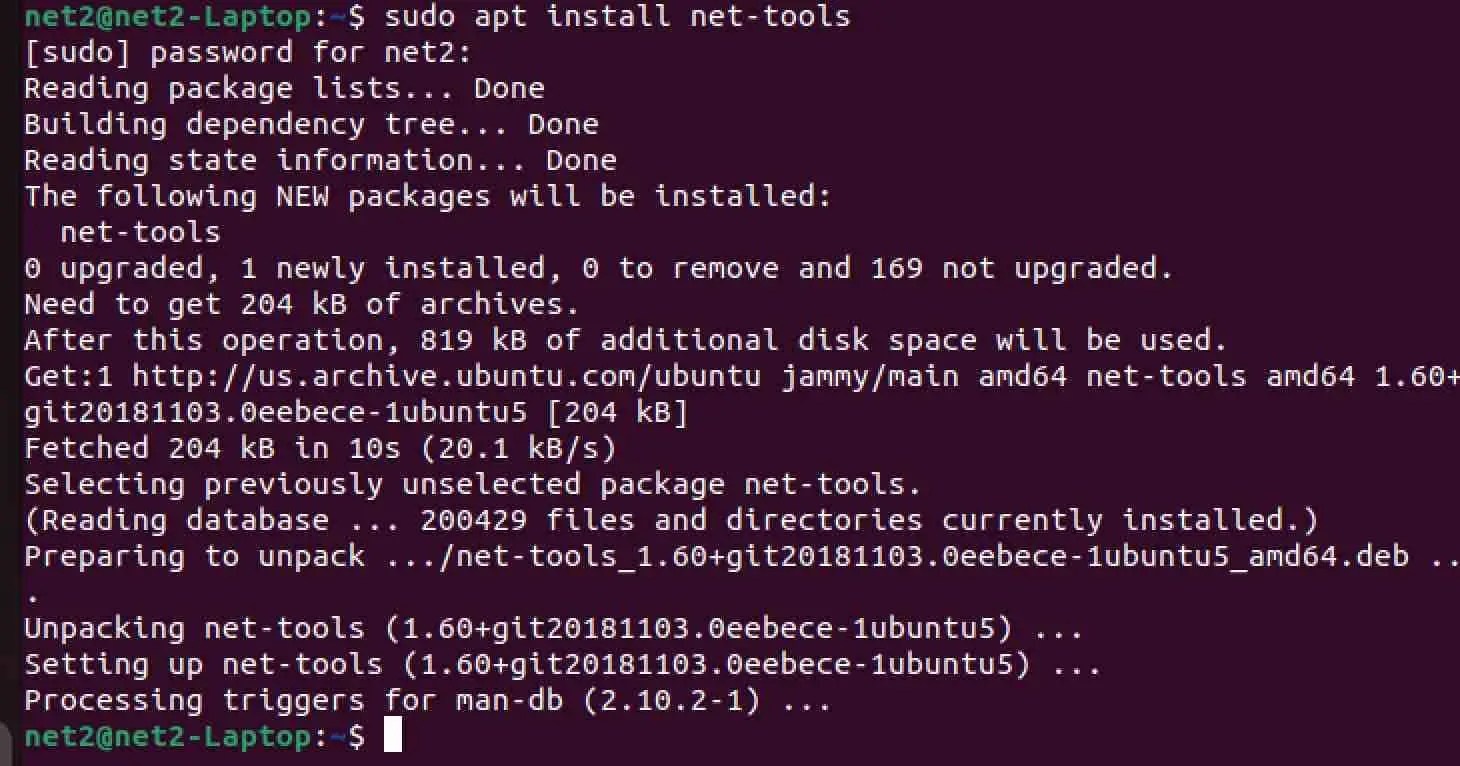
If it is not installed on your system, execute the command below :
sudo apt install net-tools
Now , you will be able to invoke the ifconfig command:
How to List All Network Interfaces in Ubuntu 22.04
In Ubuntu 22.04, there are two ways to list all network interfaces:
Using the ip a command: This command will list all network interfaces, including their logical names, IP addresses, and other settings.
ip a
This output shows that there are two network interfaces on the system: lo and enp0s3. The lo interface is a loopback interface, which means that it is connected to itself. The enp0s3 interface is a physical interface that is connected to a network.
The inet entry for each interface shows the IP address and subnet mask for the interface. The valid_lft and preferred_lft entries show the lifetime of the IP address.
Using the sudo lshw -class network command: This command will list all network interfaces, as well as more detailed information about each interface, such as its bus information, capabilities, and driver details.
sudo lshw -class network
The ip a command is a quick and easy way to get a list of all network interfaces. However, the sudo lshw -class network command provides more detailed information that can be useful for troubleshooting or configuring Ubuntu etc network interfaces.
Configuring Ethernet Interfaces on Ubuntu 22.04
Ethernet interfaces can be configured in a variety of ways. Some of the most common configuration options include:
- IP address: The IP address is a unique identifier for a device on a network.
- Netmask: The netmask is used to mask part of the IP address, which allows the device to distinguish between different networks.
- Gateway: The gateway is the address of the router that the device uses to connect to other networks.
- DNS servers: The DNS servers are used to resolve hostnames to IP addresses.
Where is the network config file in Ubuntu?
These configuration options can be set using the netplan configuration file. The netplan file is located in the /etc/netplan directory.
Read: Configuring static and dynamic IP Addresses in Ubuntu using Netplan
Logican naming of Ethernet Interfaces
Ubuntu uses predictable naming for Ethernet interfaces based on device attributes. Common names like eno1 follow the pattern en (Ethernet) o (onboard) 1 (index).
Modifying Ethernet Interface Names
With netplan, we can configure custom logical interface names by matching on attributes like MAC address. Set the new name using set-name in the YAML config:
match:
macaddress: 11:22:33:44:55:66
set-name: mynic1
The process of “matching” involves utilizing specific criteria such as MAC address, driver, and other parameters to locate a corresponding adapter.
network:
version: 2
renderer: networkd
ethernets:
ethpn0:
dhcp4: true
match:
macaddress: 66:55:44:33:11:00
set-name: ethpn0
Viewing Ethernet Interface Settings
The ethtool utility displays configured settings and supported features of Ethernet adapters like speed, duplex mode, and Wake-on-LAN:
ethtool enp0s3
If ethtool is not installed, run:
sudo apt-get install ethtool
You can tune interface settings with ethtool (see next section):
ethtool -s enp0s3 speed 1000 duplex full autoneg off
You will also be able to view detailed interface statistics with:
ip -s link
And check operational state in /sys/class/net/enp0s3/operstate. This provides valuable telemetry for troubleshooting.
Read: How to display your sound card details using the terminal on Ubuntu 22.04
Configuring Ethernet Speed and Duplex
You can set appropriate Ethernet speed and duplex based on your network using the following command for instance:
ethtool -s enp0s3 speed 100 duplex full autoneg off
This disables auto-negotiation and forces 100Mbps full duplex. Auto-negotiation should be used when possible for maximum compatibility.
Check your switch port configuration to determine if auto-negotiation, speed, and duplex need to be hard-set. Mismatched settings can cause performance issues.
Setting the Ethernet MTU
The maximum transmission unit (MTU) limits the Ethernet frame size. Set your MTU to match network infrastructure:
ip link set mtu 9000 dev enp0s3
Larger MTUs improve performance with supported equipment. 1500 is standard.
Bringing Up and Down Ethernet Interfaces
Ethernet interfaces can be brought up and down using the following commands:
ip link set dev up
This command brings the specified interface up.
ip link set dev down
This command brings the specified interface down.
Tuning Ethernet Offloading and Segmentation
Advanced NICs support options like TCP segmentation offload (TSO), generic receive offload (GRO), and others to reduce CPU usage. Enable if supported:
ethtool -K eno1 tso on gro on gso on
Offloading is usually enabled by default but can be checked and tuned.
Persisting Ethernet Configuration
Changes made with ip and ethtool are temporary. To persist, edit Netplan YAML:
/etc/netplan/01-netcfg.yaml
network:
ethernets:
eno1:
mtu: 9000
dhcp4: no
addresses: [192.168.1.100/24]
gateway4: 192.168.1.1
nameservers:
addresses: [1.1.1.1, 8.8.8.8]
optional: true
Or use traditional interface files like /etc/network/interfaces.d/*.cfg.
Example Ethernet Config Scenarios
Multiple IP addresses:
addresses:
– 192.168.1.100/24
– 172.16.1.50/24
Jumbo Frame MTU:
mtu: 9000
Custom MAC address:
macaddress: 00:11:22:33:44:55
VLAN interface:
eno1.100:
addresses: [192.168.2.100/24]
vlan: 100
This covers common Ethernet configuration scenarios in Ubuntu 22.04. Adjust settings to optimize your network connectivity.
Troubleshooting Ethernet Interfaces
If an Ethernet interface is not working properly, there are a few things that can be checked:
- Make sure that the interface is enabled. This can be done by checking the ip link show output.
- Make sure that the interface has a valid IP address. This can be checked by checking the ifconfig output.
- Make sure that the interface is connected to a network. This can be checked by connecting a cable to the interface and then checking the ip link show output.
If the interface is still not working properly, it may be necessary to troubleshoot the hardware.
Read: How to fix Bluetooth connection issues on Ubuntu 22.04
Configuring IP Addresses
Temporary IP Address Assignment
The ip command can quickly configure temporary network settings, though these are lost after restarting:
sudo ip addr add 10.0.32.15/24 dev enp0s3
Check the interface config:
ip addr show dev enp0s3
Set a temporary default gateway:
sudo ip route add default via 10.0.2.1
Verify the gateway:
ip route show
For temporary DNS, edit /etc/resolv.conf with nameserver IPs.
Flush the temp IP config when done:
ip addr flush enp0s3
Dynamic IP Allocation through DHCP Client
With the assistance of Netplan, a command-line utility introduced in Ubuntu 17.10, the process of Ubuntu network configuration and management has been streamlined. In this section, we’ll walk you through the steps of setting up dynamic IP address assignment using Netplan.
Understanding Netplan and Dynamic IP Addressing
In Ubuntu, managing network interfaces has been made hassle-free thanks to Netplan. Working in conjunction with Ubuntu Network Manager and systemd-networkd daemons as intermediaries to the kernel, Netplan is founded on YAML files. This ingenious setup facilitates a smooth configuration experience for network interfaces.
The Shift from /etc/network/interfaces to /etc/netplan/*.yaml
Gone are the days of managing network configurations through /etc/network/interfaces. Netplan ushers in a new approach by utilizing /etc/netplan/*.yaml files to store network configurations. This central location neatly organizes your network interface setups.
Enabling Dynamic IP Address Assignment (DHCP Client)
Step 1: Creating Your Netplan Configuration
To enabe DHCP for dynamic address assignment, you’ll need to craft a Netplan configuration file. Locate the directory /etc/netplan/ and create your configuration file there. For instance, my configuration file is named 01-network-manager-all.yaml:
If you’re dealing with more than one interface, such as a second one, consider naming your configuration file 02-network-manager-all.yaml. Remember, Netplan applies configurations in numerical order.
Here’s how your configuration should resemble the provided example below, assuming you’re setting up the configuration for the second Ethernet interface, enp3s1 (hence the file named 02-network-manager-all.yaml)
network:
version: 2
renderer: networkd
ethernets:
enp3s1:
dhcp4: true
Step 2: Applying the Configuration
With your Netplan configuration polished and ready, it’s time to apply the changes. Open your terminal and enter the following command:
sudo netplan apply
Read: How to set up a firewall on Ubuntu 18.04
How to reset network settings in Ubuntu 22.04
Resetting networking configuration is a common task for Linux administrators. When troubleshooting connectivity issues or attempting to clear misconfigured settings on Ubuntu 22.04 systems, you may need to completely reset and restore networking components to their default state. This section will cover multiple methods to completely reset Ubuntu networking and IP configuration.
GUI Options for Resetting Network Manager on Ubuntu Desktop
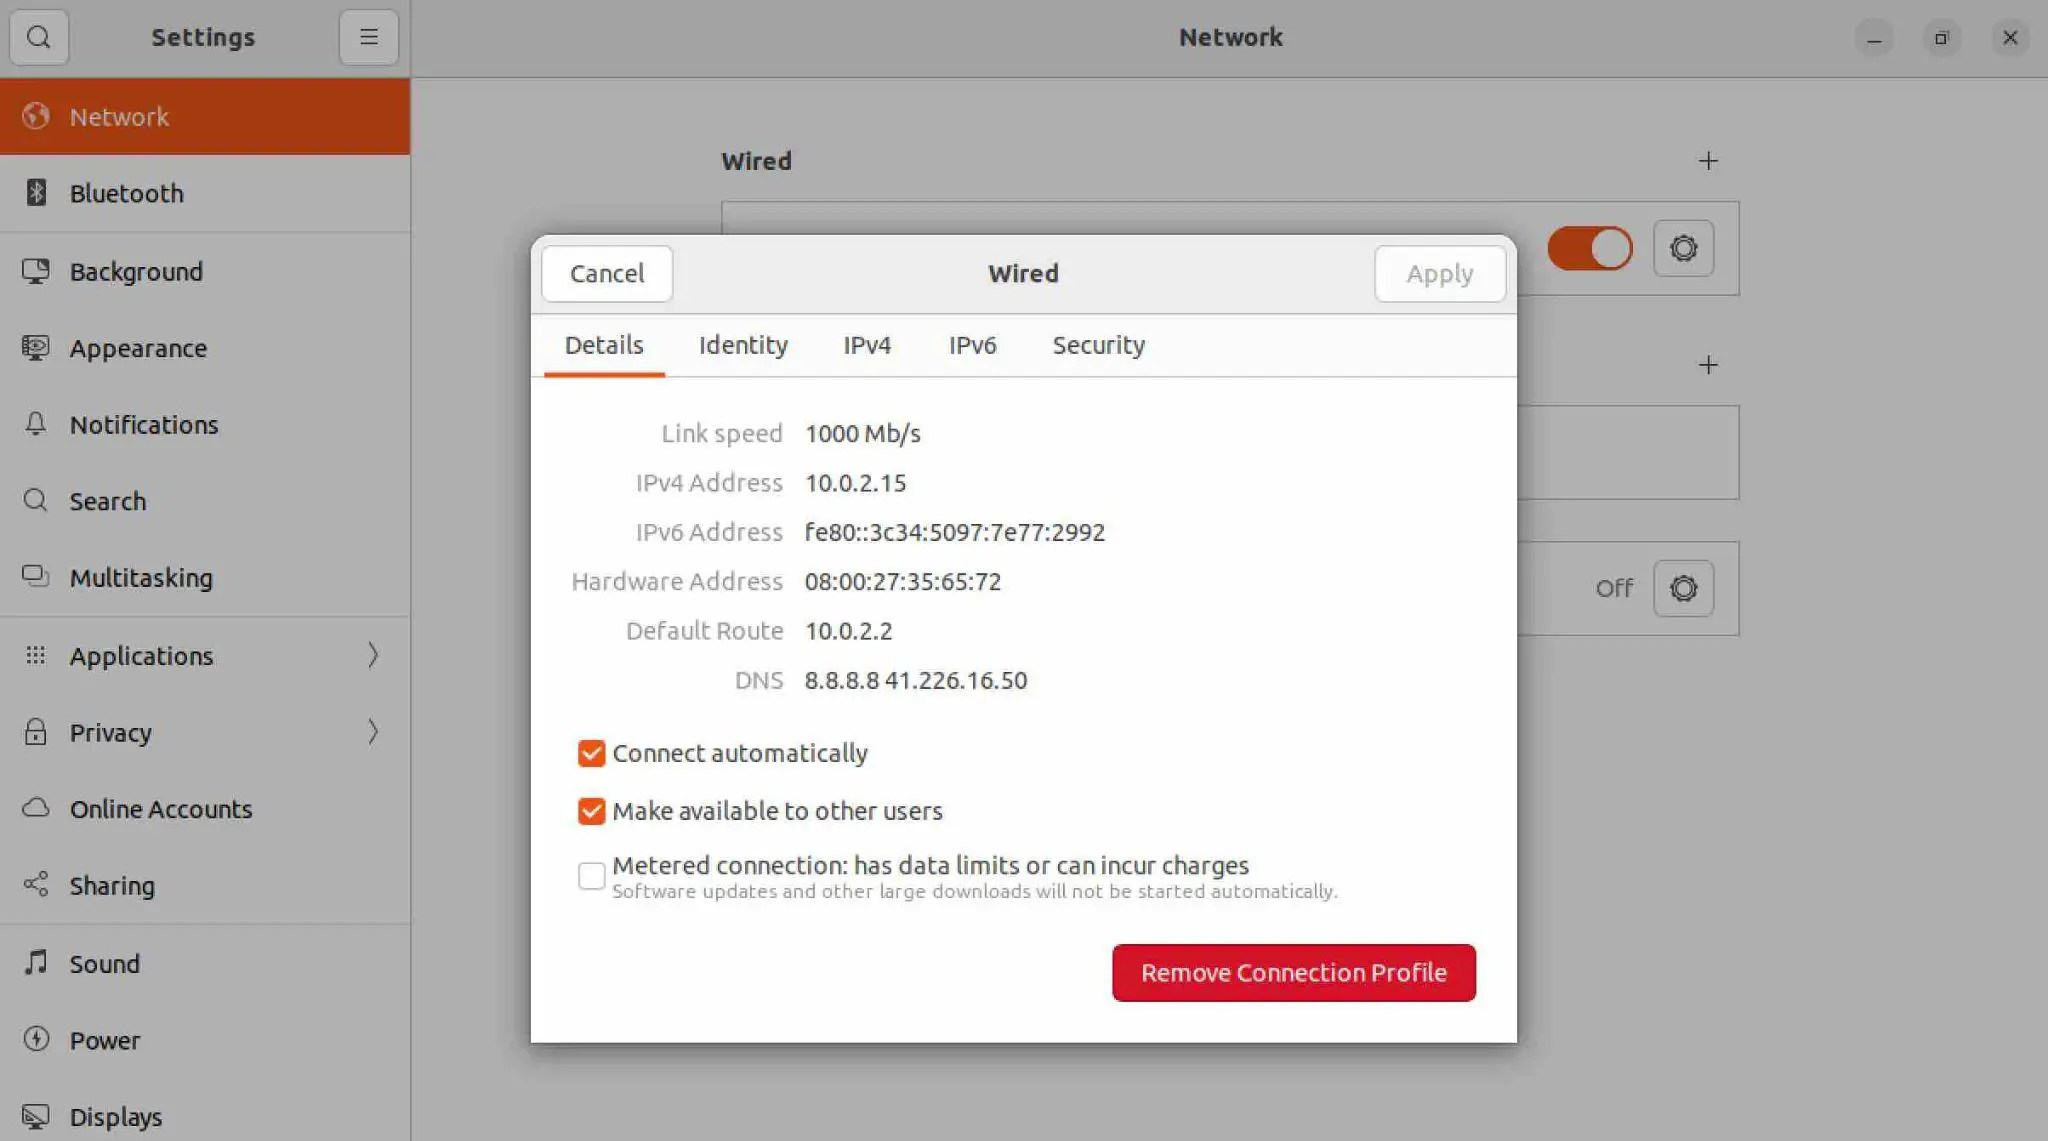
For Ubuntu desktop users, the most straightforward option is to use the Network Manager GUI in Settings to delete and recreate connection profiles. This will remove any custom IP, DNS, and other settings applied to those connections (Ubuntu reset network settings using the GUI).
Command Line Options for Resetting Networking on Ubuntu Server
Server administrators will need to use command line tools like Netplan, nmcli, systemd-resolved, and low-level IP commands:
- Use nmcli and netplan to delete all connection profiles and restore default DHCP networking. This resets IP configuration.
- Flush IP addresses and reset interface configuration with ip addr flush dev eno1 for example.
- Restart networking services like NetworkManager and systemd-resolved to apply changes.
- Modify Grub to reset all networking to factory defaults during boot.
How to Completely Reset Network Manager and All Config on Ubuntu
For a complete reset of NetworkManager, Netplan YAML config files under /etc/netplan can be deleted and network services restarted to reset Ubuntu networking to a fresh out-of-the-box state.
Netplan Static IP Address Allocation Process
When it comes to configuring static IP address assignment, your go-to approach involves crafting a netplan configuration housed within the file located at /etc/netplan/01-network-manager-all.yaml. In cases where your focus turns to the initial Ethernet interface setup, you’ll find guidance in the example presented below.
Don’t forget to make the necessary adjustments to the addresses, nameservers and gateway4 values to align with the specific requirements of your network.
Execute the configuration once more by invoking the following command:
sudo netplan apply
Using NetworkManager for Static IPs
The NetworkManager utility provides another handy way to configure static IPs, especially on Ubuntu desktops. We can use the nmcli tool to talk to NetworkManager from the command line. (Note that GNOME Network Manager provides a graphical user interface and set of CLI tools (nmcli) for configuring network connections on Ubuntu ) .
First, let’s check the existing network connections:
nmcli connection show
Ubuntu 22.04 set static ip connection: To add a new static IP connection for eno1:
nmcli connection add con-name static-eno1 ifname eno1 type ethernet ip4 192.168.1.10/24 gw4 192.168.1.1
We provide the connection name, interface name, IP address, subnet mask, and default gateway. NetworkManager will automatically persist this static configuration across reboots.
Read: How to check memory usage on Ubuntu 22.04
Name Resolution
Name resolution is a fundamental aspect of networking that involves mapping IP addresses to human-readable hostnames. This makes it easier to locate and connect to devices and services by name rather than remembering numeric IP addresses.
On Ubuntu 22.04 and Linux systems, the Domain Name System (DNS) is the primary technology used for name resolution and mapping hostnames to IPs.
In this section, we’ll look at how to configure DNS client settings on Ubuntu 22.04 for proper name resolution.
DNS Client Configuration in Ubuntu 22.04
Traditionally, DNS settings on Linux were specified in the static /etc/resolv.conf file. This included nameservers and search domain suffixes. However, Ubuntu 22.04 now uses systemd-resolved to manage DNS configuration.
Netplan and systemd-resolved
On Ubuntu 22.04, netplan utilizes the systemd-resolved daemon to generate resolv.conf settings. Nameservers and search domains defined in netplan are passed to systemd-resolved, which then populates the /etc/resolv.conf symlink file.
So to configure DNS with netplan, we can add nameservers and search suffixes to a netplan config like:
network:
version: 2
ethernets:
eno1:
dhcp4: yes
nameservers:
addresses: [8.8.8.8, 8.8.4.4]
search: [mydomain.com, myotherdomain.com]
Now systemd-resolved will create the proper /etc/resolv.conf based on the Ubuntu netplan DNS configuration.
Setting Up Custom Local DNS Resolution
Add .local host entries in /etc/hosts:
192.168.1.100 nas.local
This allows querying nas.local from the system.
Install dnsmasq for more advanced local DNS:
sudo apt install dnsmasq
Configure /etc/dnsmasq.conf and create local DNS entries. Enable systemd service to start dnsmasq.
Caching and Securing DNS with dnsmasq
Caching – Configure dnsmasq to cache DNS queries and improve speed:
cache-size=10000
Block ads – Null route common ad servers:
address=/doubleclick.net/127.0.0.1
Block domains – Null route unwanted domains:
address=/badsite.xyz/127.0.0.1
DNSSEC – Enable DNSSEC validation for improved security:
dnssec
This expands DNS functionality while improving local speed and security.
Checking DNS with dig
We can verify name resolution using the dig command line tool. For example, to look up the A record for ubuntu.com:
dig ubuntu.com
This will query the configured nameservers and return the IP address for ubuntu.com.
Read: How to Check Disk Space in Ubuntu 22.04
Network Bridging
Utilizing bridging to interconnect multiple interfaces serves as an advanced configuration strategy applicable in diverse scenarios. Consider, for instance, the creation of a bridge spanning multiple network interfaces to facilitate traffic filtration between two distinct network segments through a firewall. Alternatively, envision a scenario in which a system with a sole interface leverages a bridge, enabling virtual machines to seamlessly access the external network.
To demonstrating the latter application, consider the following:
Modifying your netplan configuration located within /etc/netplan/ to establish bridge configuration:
To activate the Bridge, .i.e. to bring the bridge interface to life, execute the command:
sudo netplan apply
With this action, the newly formed bridge interface should now be operational. For managing the bridge’s state, you can turn to the brctl utility. For in-depth insights, refer to the man brctl command.
Setting Up a Static IP Address on Ubuntu Desktop
When it comes to configuring a static IP address, Ubuntu provides a user-friendly graphical interface that simplifies the process.
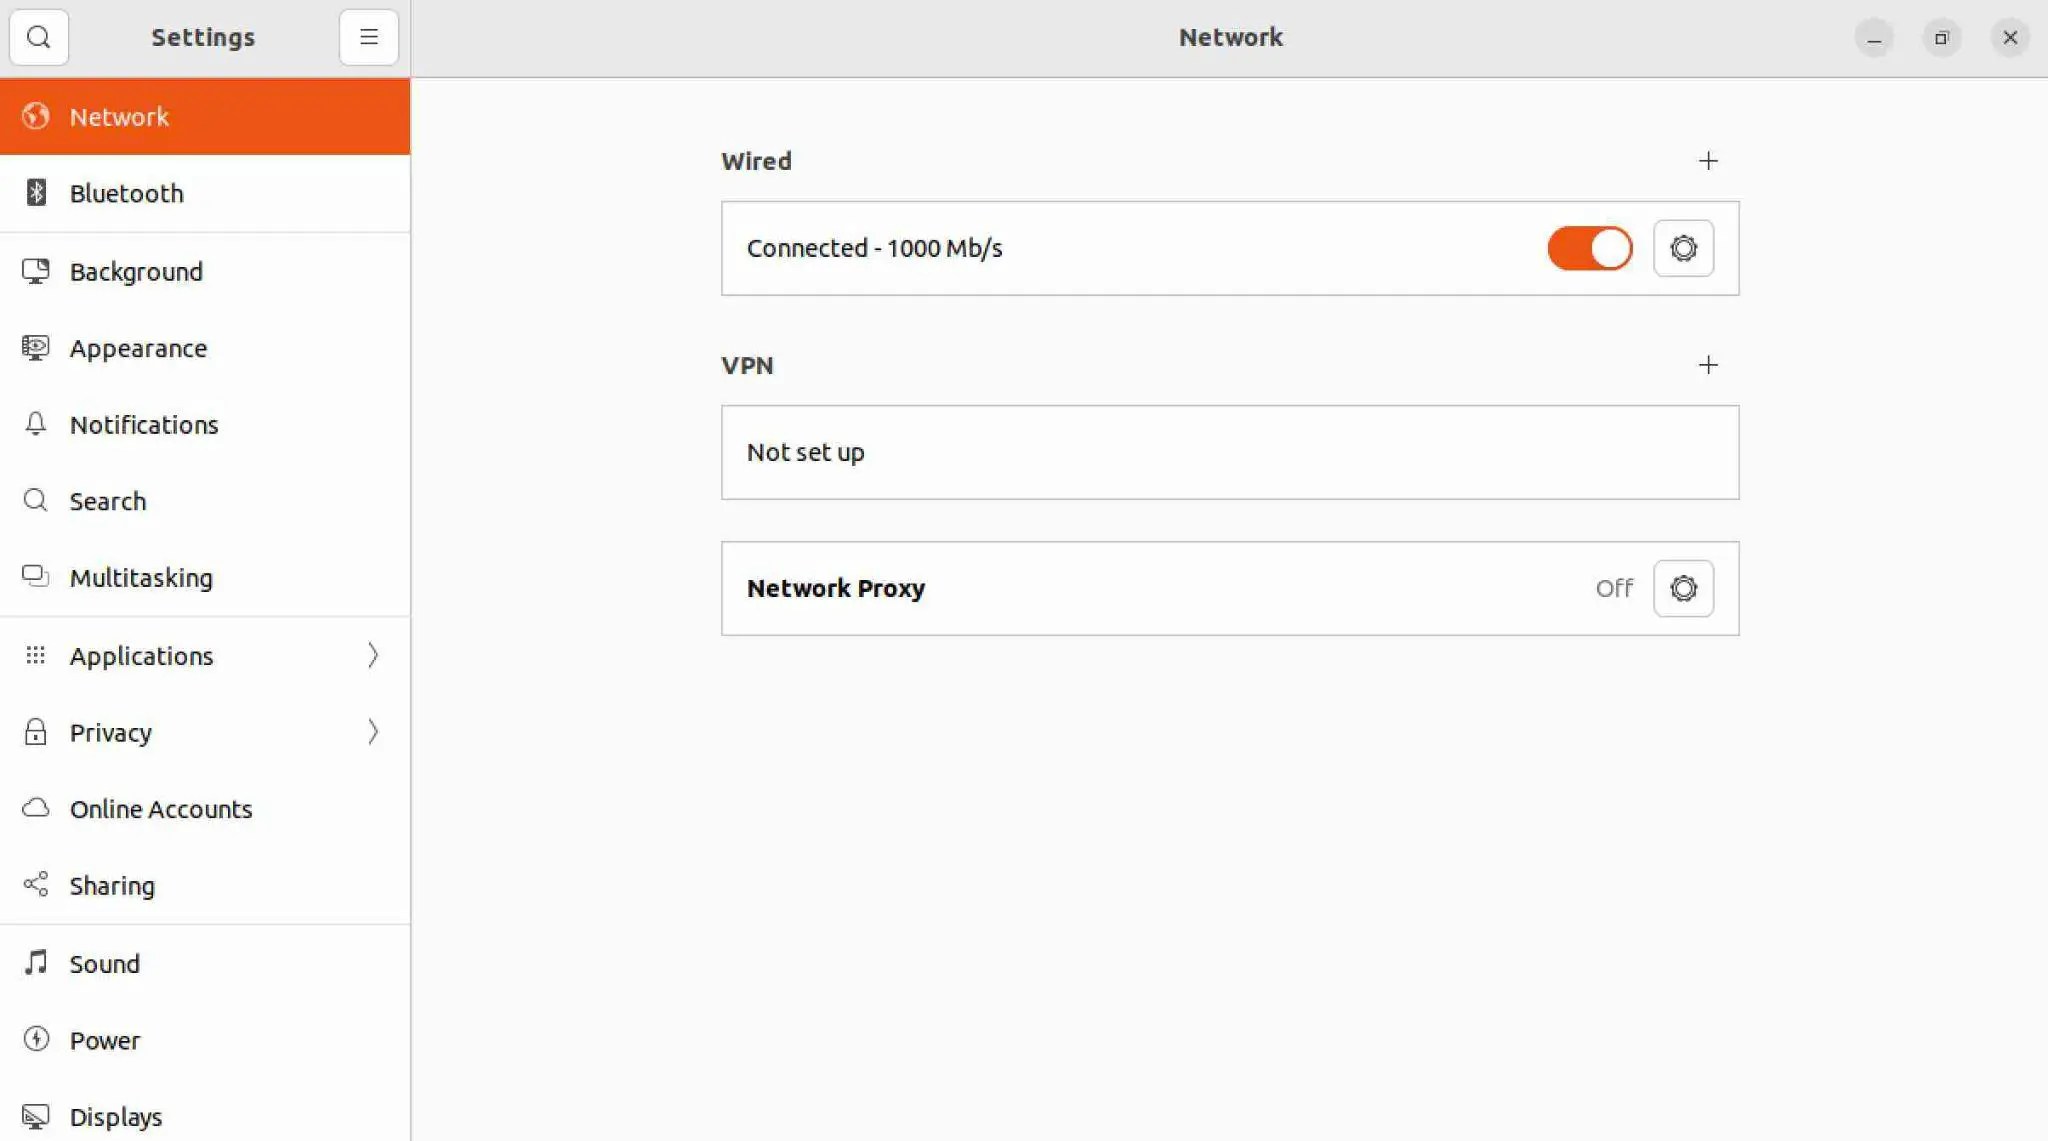
1 – Where is the network configuration in Ubuntu? At the upper-right corner of the screen, locate and click on the network icon:
2 – Next, navigate to the bottom left corner of the black window and click on the tools icon. 3 – The network configuration in Ubuntu will then be accessible. In the Wired section, locate the cog icon positioned next to the ON button and click on it.
3 – This action will display the Network interface settings window.
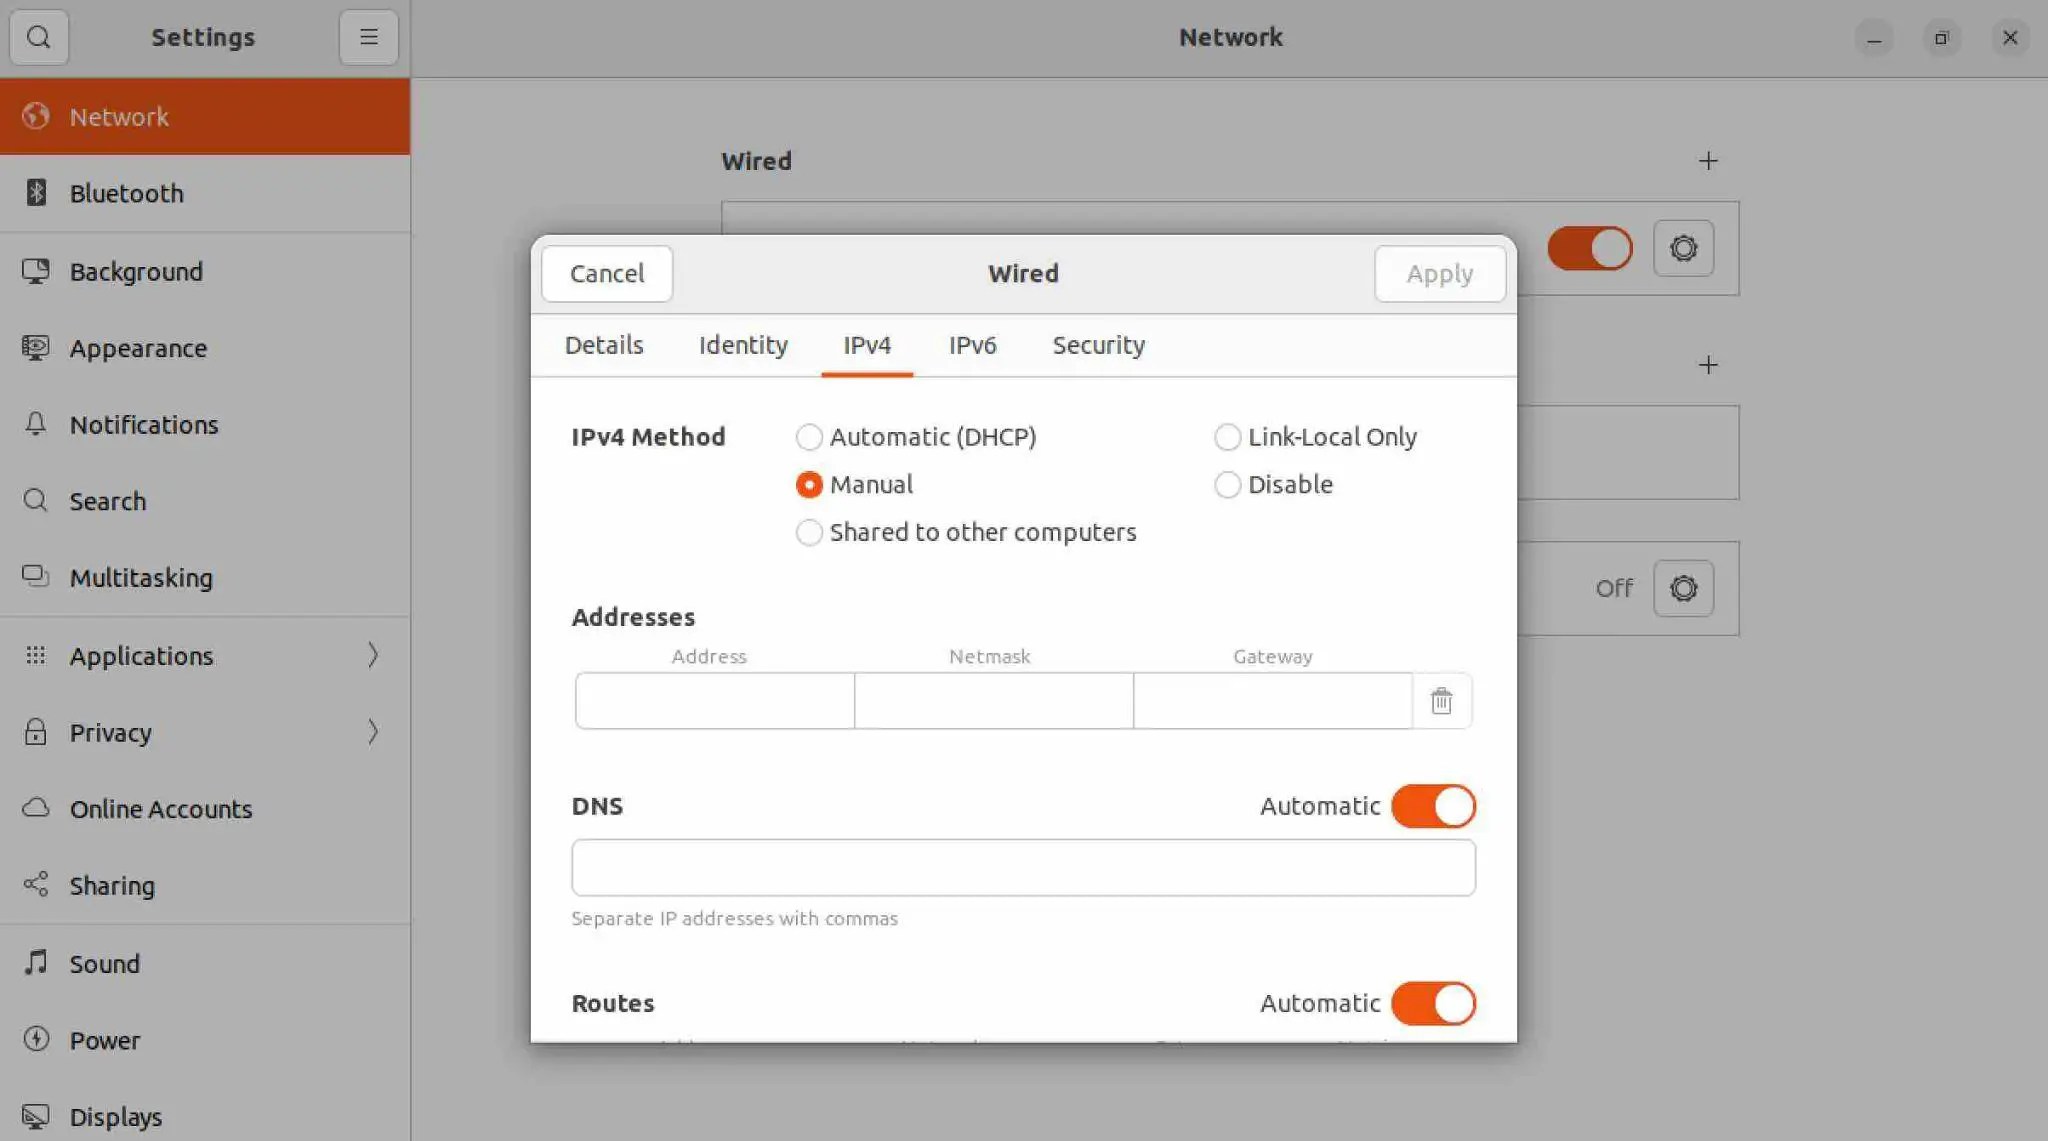
- 4 – In the “IPv4 Method” section, opt for “Manual” and input your desired Ubuntu configure static ip address. Alongside, set the appropriate Netmask and Gateway values to align with your network requirements. Upon completion, proceed by clicking the “Apply” button :
Once your Ubuntu 22.04 static ip address configuration is established, access your terminal and validate the changes by executing the command:
ip addr
Read: How to fix Wifi issues on Ubuntu 22.04 – A complete guide
Configure a static IP on Ubuntu 22.04 using nmtui
While GUI tools like NetworkManager are convenient, accessing the TUI nmtui tool provides greater flexibility for server admins. This comprehensive section will cover the steps to configure a static IP on Ubuntu 22.04 using nmtui terminal user interface, optimized for search engines.
Quick Steps for Setting a Static IP Address on Ubuntu Server:
Install nmtui if needed:
sudo apt install nmtui
Run nmtui from terminal:
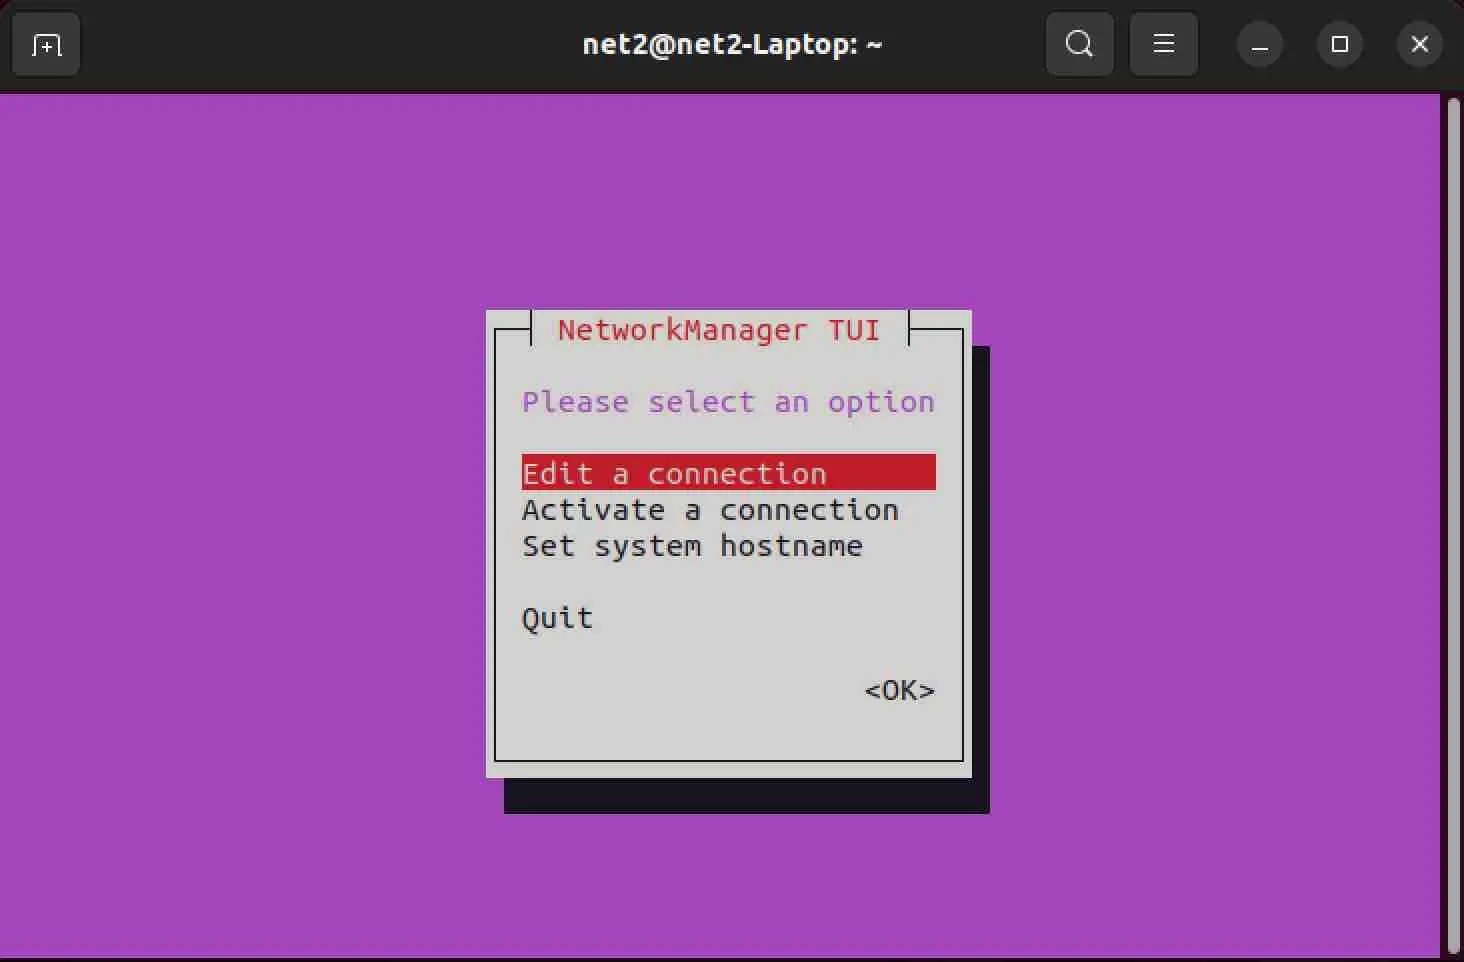
sudo nmtui
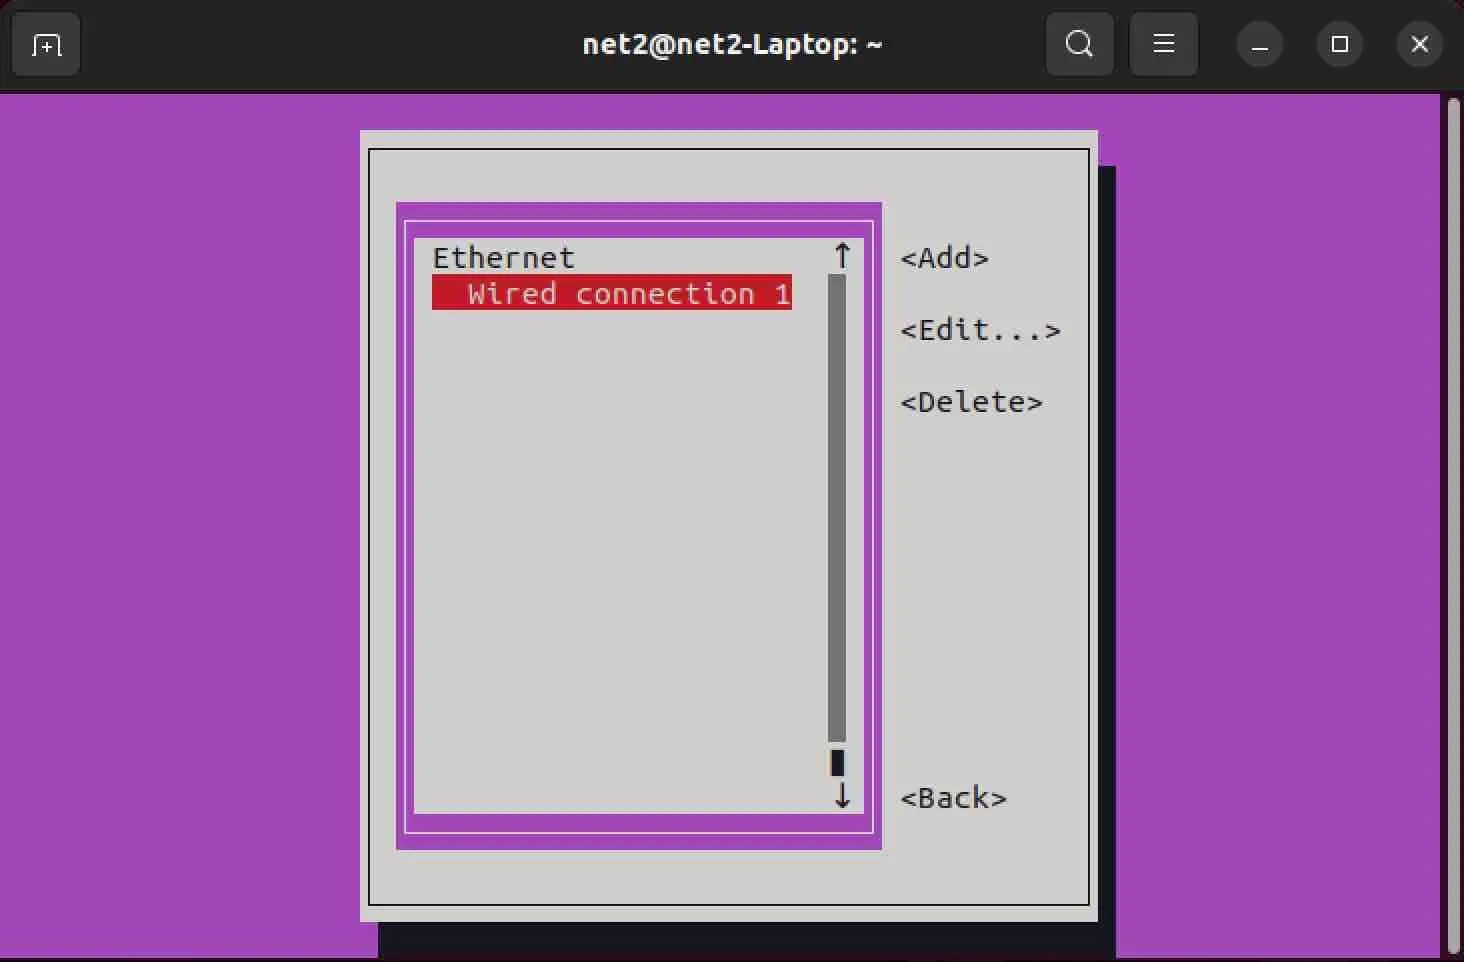
Edit your desired connection,
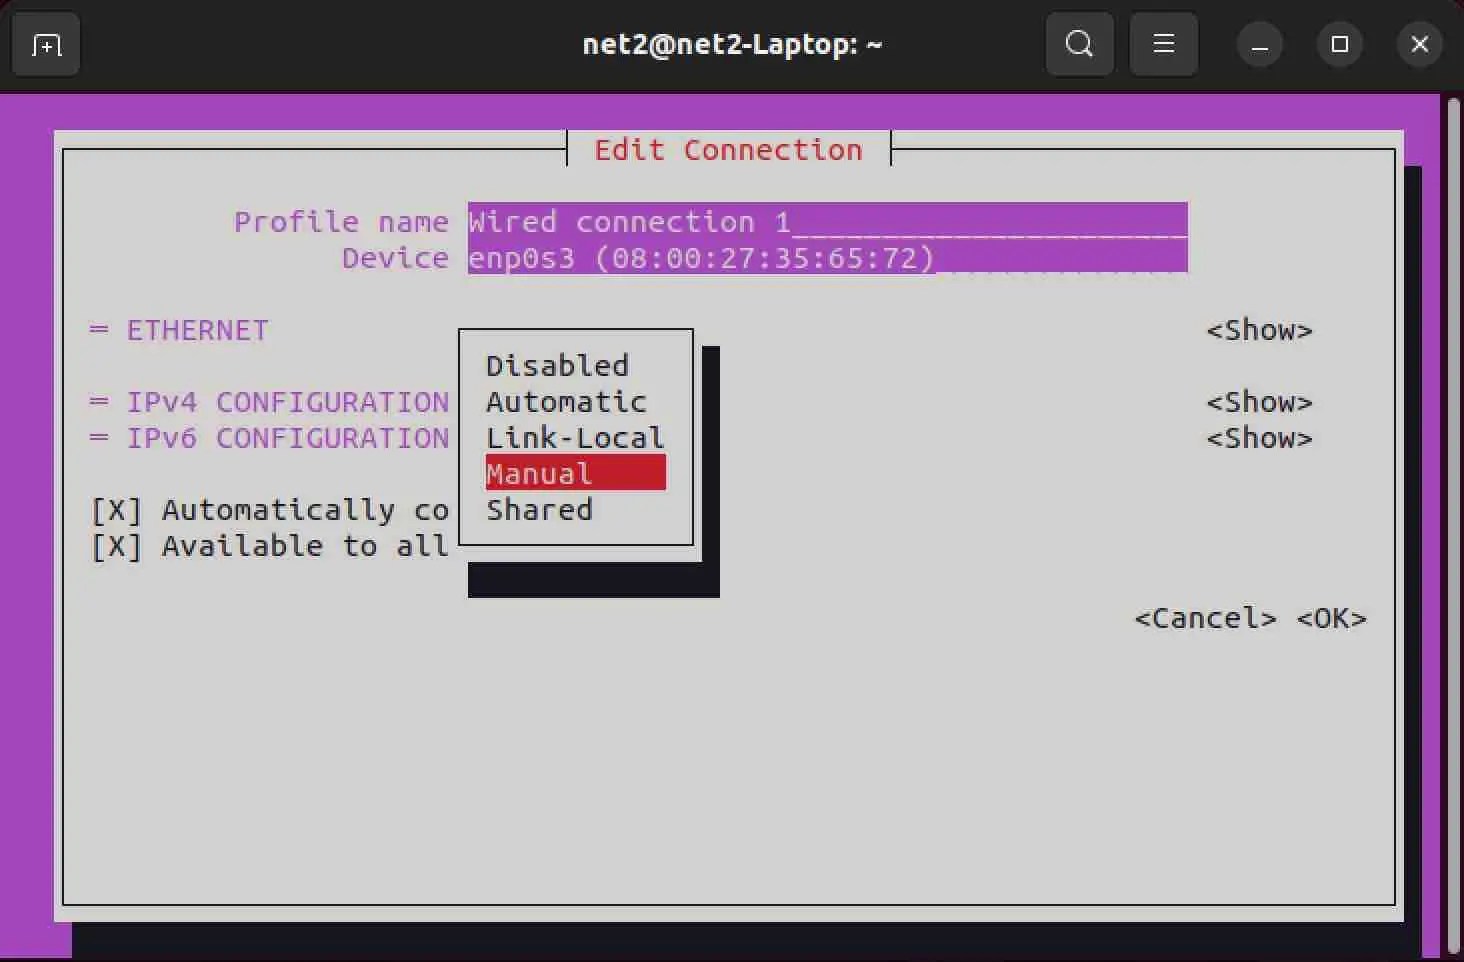
select IPv4 configuration as “Manual” :
and click on button:
- Enter your static IP address, netmask, gateway and DNS servers
- Save changes and exit nmtui
- Restart networking or reboot to apply new static IP config
How to Permanently Set Static IP Address with nmtui on Ubuntu 22.04 LTS:
nmtui provides an interactive terminal UI that integrates with NetworkManager to modify connections. For Ubuntu server admins, it offers extensive options for addressing, routing, DNS, and other settings.
After installing nmtui, run sudo nmtui and use the arrow keys to edit your desired connection. Navigate to the IPv4 tab and change the method to “Manual”. Enter your desired static IP address, netmask, gateway, and DNS servers.
Save your changes and exit nmtui. The connection profile will be updated with the new static configuration. Restart the NetworkManager service or reboot to ensure the static IP takes effect.
Using nmtui for Static IP Configuration Offers Granular Control:
nmtui makes it easy to configure complex static IP setups on Ubuntu servers, with fine-grained control over IP addresses, subnets, gateways, DNS, and much more. This grants administrators optimal control when configuring static addressing for servers and infrastructure.
Discover more from Ubuntu-Server.com
Subscribe to get the latest posts sent to your email.


